EntroStar Access Control and Interlock Configuration
11 May 2020
The powerful “Automatic Actions” feature of EntroWatch allows the setting up of versatile door interlocks for many security and safety applications. A door interlock is where access through one (or more) doors is inhibited by the status of another door (or doors). For example, a two door airlock, where only when one door is closed will access be granted through the other door.
A scheme can involve more than two doors, for example a group of five doors off a corridor where only one door is allowed to be opened at any one time. An interlock can also include a non-access control door, for example a fire escape door. This needs the door to be fitted with a contact to provide the action trigger input.
When a door is forced to “No Access” its card reader LEDs will normally show Red, indicating to the user to wait for the other door to be closed. If two doors of an interlock are on the same EntroStar, then the interlock will continue to function without the network connection. Where included doors span across multiple Entrostars, the integrity of the interlock depends on the network connections between those EntroStars.
It is possible, if two users present cards at the same time for access to be granted at both doors but as soon as the first door’s status contact opens then the second door will be relocked. It is important to check that all the specified conditions for each interlock application are fully met.
The EntroWatch server does not need to be running for the interlock to function.
Example Steps to Configure A Two Door Interlock (or Airlock)
For an interlock between two doors, two Automatic Actions need to be configured where the door contact status of one door forces “No Access” on the other, as follows:
- From the EntroWatch Dashboard, select the “Equipment” tile. Identify the doors to be included and their controller(s). Note the System Name (serial number) of the controller(s). It is best if the two interlocked doors are on the same controller as any network effects and delays are eliminated, however, interlocks can be set up peer-to-peer.
- From the EntroWatch Dashboard, select the “Actions” tile.
- Select “Add” and “Automatic”
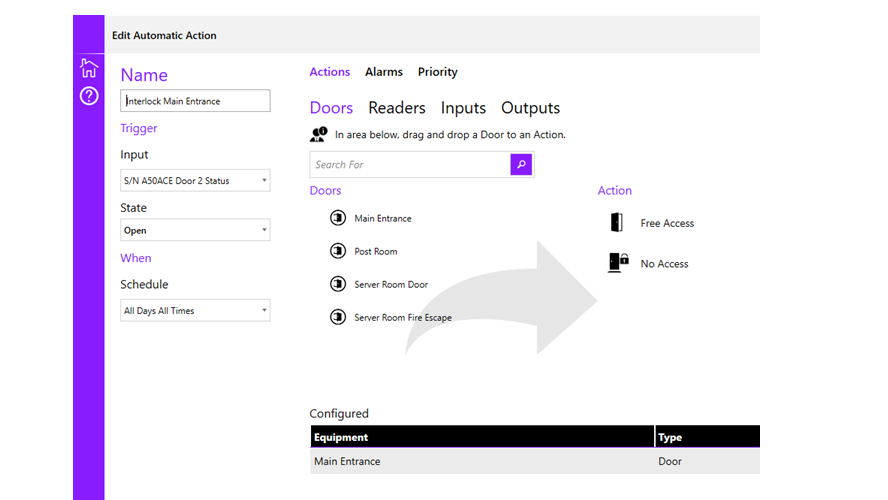
- To configure the first Action include:
- Name (for the Interlock)
- Trigger Input = Status of second door (refer to serial number)
- State = Open
- Schedule is “All Days All Times” or select required schedule
- Select first door from “Doors” and drag and drop it “No Access”
- Reset action is “default”
- Click Save
- To configure the second Action, select “Add” and “Automatic” again.
- Configure the second Action include:
- Name (for the Interlock)
- Trigger Input = Status of second door (refer to serial number)
- State = Open
- Schedule is “All Days All Times” or select required schedule
- Select second door from “Doors” and drag and drop it “No Access”
- Reset action is “default”
- Click Save
- Finally, test the interlock for correct operation , both ways. Note: Multiple doors can be interlocked by dragging and dropping additional doors into the No Access Action.
For more information on how to configure Interlock with an Entro series access control system please contact us.